The OFFICIAL "Mance Mount" Strut Mount Installation Instructions
Thought I'd post this where its easily searchable now and in the future.
Bear in mind due to the ultra-close tolerance of these mounts there is no undue
force involved in any aspect of their installation. If you're thinking of
grinding, hammering, putting some part in a vice or hydraulic pressing ANY part
of this project you're doing something wrong! STOP, take a breather and re-think
the task. Everything goes together by hand except for final tightening of the
bolts/nuts.
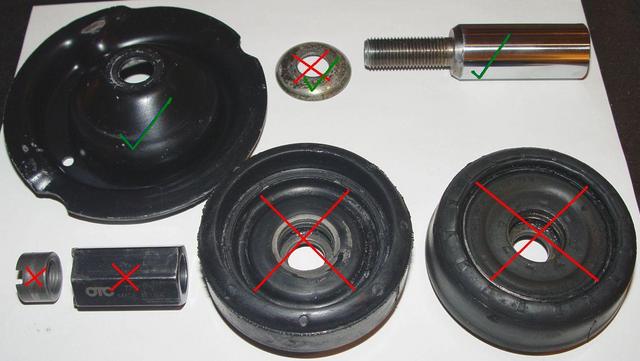
In this pic use only the "green check" items with the solid mount. Gold anodized
washer in center of top row is optional, use it or dont... entirely your call.
With it you gain approx .100" more ride height and nothing more.
Other than than items pictured in top row nothing is re-used from the stock
mounts.
FRONT SOLID MOUNT INSTALLATION PROCEDURE
1. Remove front struts.
2. Align drill guide in strut towers tops with the bolt pattern how you want it.
You can have your 4 bolt pattern in any 360 degree rotation. Make sure centering
ring is fully seated within strut tower bore. Tap softly with a hammer if
necessary as its a very tight, precision fit on some cars as some strut towers
thru-holes are a few thousandths tighter than others. Push bolt thru and thread
into cross-bar while holding from underneath. Tighten sufficiently so it doesnt
move and is firmly seated within strut tower.
3. Place a drop of engine oil on the inside walls of each hole in the drill
guide and on the strut tower top beneath each hole in the guide. If you dont
have oil nearby grab the dipstick and use some from its tip. This will help
prevent the guide holes from enlarging during drilling and allow you to drill
thru the strut tower metal easier with less heat and strain on the bit and
drill. Drill all four holes and remove drill guide from strut tower. Wipe any
excess oil and metal chips off drill guide and strut towers.
4. De-burr drilled holes from underside where drill punched thru. Best
accomplished with a 3/8" or larger drill bit lightly spun with point centered in
hole from underneath. Do NOT apply pressure or drill thru strut towers with this
drill!! Just a quick de-burring touch-up at each hole to remove sharp
edges/burrs.
5. Repeat process at opposite side of car.
6. Compress spring and remove stock rubber mount from strut assembly. NO PART OF
THE STOCK MOUNT IS RE-USED!! Remove gold anodized washer found below upper
spring perch at this time if desired.
7. Install new solid mount on top of upper spring perch on "compressed" spring.
Hand tighten 24mm sleeved nut on to threaded strut inside spherical bearing.
Make sure to have "at least" 4-5 threads engaged or more if you can. Compress
spring more if necessary. Ideally there should only be 2-4 unused threads
showing from top of 24mm strut nut when fully screwed down. Once 24mm sleeved
nut is threaded on release spring compressor.
8. Replace strut into car. Align 4 holes you drilled with the drill guide to the
threaded holes in the new strut mounts. Thread all 4 stainless mount bolts thru
strut towers and into solid mount. Make sure center shoulder is centered in hole
at top of strut tower. Its a very tight, precision fit. Use no LocTite at this
time!
9. Re-install and tighten all bolts removed with regard to hub/knuckle/tie rod
and sway bar that were removed during strut removal. Once done lower car until
solid mount is firmly seated within strut tower underside by weight of car.
Firmly tighten all nuts and fasteners.
10. Drive car for 2-3 miles and return to work space. This will settle-in all of
the components.
11. Remove all stainless fasteners and 24mm sleeved nut with car resting on
solid mounts. Nothing will fly apart as cars weight will hold everything in
place. Do not turn wheels while no retaining bolts are holding mounts or you
risk mis-aligning the mounts holes with holes you drilled in strut towers!!
11. Now apply LocTite to all stainless allen cap bolts and 24mm sleeved nut.
Tighten firmly but DO NOT over tighten!! 24mm sleeved nut is best tightened with
a box-end wrench so that a 6mm allen wrench can keep the hex-ended strut rod
from turning.
NOTE* Mance Mount strut mounts' spherical bearings are sealed and lubricated for
life. No additional maintenance or lubrication is EVER required or needed. Use
no oil/grease on them as it is a dirt magnet!
REAR SOLID STRUT MOUNT INSTALLATION
1. Everything is as above with the exception of drill guide can be used for
drilling strut towers from top if you have sufficient clearance. Or you can use
it from below. Some rear installations are easier to drill from below. Rear
installation kits come with a short and long drill bit to facilitate
installation from above or below.